OkHttp 是一款优秀的HTTP框架,它支持get请求和post请求,支持基于Http的文件上传和下载,支持加载图片,支持下载文件透明的GZIP压缩,支持响应缓存避免重复的网络请求,支持使用连接池来降低响应延迟问题。
基本用例
首先看一下它的基本使用:(具体的使用方法请看官方文档)
1
2
3
4
5
OkHttpClient client = new OkHttpClient(); Request request = new Request.Builder() .url("https://www.baidu.com") .build(); Response response = client.newCall(request).execute();
OkHttpClient解析
通过上面的代码我们可以看到,基本的步骤为:创建OkHttpClient对象->创建请求Request->创建新的Call并通过它请求网络。那我们先来看看第一步创建的OkHttpClient。
1
2
3
public OkHttpClient() { this(new Builder()); }
那继续看这个Builder。Builder在创建时默认设置一大堆与网络请求相关的参数:
1
2
3
4
5
6
7
8
9
10
11
12
13
14
15
16
17
18
19
20
21
22
public Builder() { dispatcher = new Dispatcher();//分发器 protocols = DEFAULT_PROTOCOLS; //协议 connectionSpecs = DEFAULT_CONNECTION_SPECS;//传输层版本和连接协议 eventListenerFactory = EventListener.factory(EventListener.NONE);//event工厂 proxySelector = ProxySelector.getDefault();//代理选择 cookieJar = CookieJar.NO_COOKIES;//代理选择 socketFactory = SocketFactory.getDefault();//socket 工厂 hostnameVerifier = OkHostnameVerifier.INSTANCE;// 主机名字确认 certificatePinner = CertificatePinner.DEFAULT; // 验证确认响应证书 适用 HTTPS 请求连接的主机名。 proxyAuthenticator = Authenticator.NONE;//代理身份验证 authenticator = Authenticator.NONE;// 本地身份验证 connectionPool = new ConnectionPool(); //连接池,复用连接 dns = Dns.SYSTEM;//dns followSslRedirects = true;//安全套接层重定向 followRedirects = true;//本地重定向 retryOnConnectionFailure = true;//重试连接失败 connectTimeout = 10_000;//连接超时 readTimeout = 10_000;//read超时 writeTimeout = 10_000;//write超时 pingInterval = 0;// }
这里的各种参数,可以根据请求要求在请求发起前对builder进行设置,这里就不展开介绍。
Request解析
Request类主要是封装了请求的相关参数,比如url,header,请求参数body,请求类型等等,这些都可以通过Request.Builder设置,这里就不多介绍了。
Http请求
在设置完相关的参数之后,就可以发起Http请求了。OkHttpClient实现了Call.Factory,并且实现其中的方法newCall(Request request),该方法返回一个RealCall对象,这个对象就是可以随时执行的http请求。执行请求有两种,同步请求和一步请求,那我们先来看看同步请求。
同步网络请求
我们先来看看RealCall中的execute方法。
1
2
3
4
5
6
7
8
9
10
11
12
13
14
15
@Override public Response execute() throws IOException { synchronized (this) { if (executed) throw new IllegalStateException("Already Executed"); executed = true; } captureCallStackTrace(); try { client.dispatcher().executed(this); Response result = getResponseWithInterceptorChain(); if (result == null) throw new IOException("Canceled"); return result; } finally { client.dispatcher().finished(this); } }
这里首先要保证一个Call只能执行一次,当多次执行时会抛出异常,其次还会去设置捕获Call的异常,然后调用OkHttpClient的dispatcher,设置当前请求的执行状态。因为在同步请求中dispatcher只标记请求状态,比如开始请求和请求完成,所以在这里就不多介绍,dispatcher更多的用在异步请求中。getResponseWithInterceptorChain方法。
1
2
3
4
5
6
7
8
9
10
11
12
13
14
15
16
17
Response getResponseWithInterceptorChain() throws IOException { // Build a full stack of interceptors. List<Interceptor> interceptors = new ArrayList<>(); interceptors.addAll(client.interceptors()); interceptors.add(retryAndFollowUpInterceptor); interceptors.add(new BridgeInterceptor(client.cookieJar())); interceptors.add(new CacheInterceptor(client.internalCache())); interceptors.add(new ConnectInterceptor(client)); if (!forWebSocket) { interceptors.addAll(client.networkInterceptors()); } interceptors.add(new CallServerInterceptor(forWebSocket)); Interceptor.Chain chain = new RealInterceptorChain( interceptors, null, null, null, 0, originalRequest); return chain.proceed(originalRequest); }
这里用到了很多的拦截器Interceptor。事实上,Interceptor是okhttp的核心。它把请求、缓存等所有的功能都统一了起来。每一个功能就是一个Interceptor。同时,这里也用到了责任链模式。所有的Interceptor都构成一个环,程序会一次执行每一个拦截器,知道最后处理完请求。client中的拦截器,这些拦截器有用户自己定义添加;其次是RetryAndFollowUpInterceptor,它主要负责失败时的重试和重定向;然后是BridgeInterceptor拦截器,它是负责把用户构造的请求转换为发送到服务器的请求、把服务器返回的响应转换为用户友好的响应;然后是CacheInterceptor,读取更新缓存;建立连接的ConnectInterceptor;client的networkInterceptors以及最后的CallServerInterceptor,它负责请求数据和读取返回数据。RetryAndFollowUpInterceptor拦截器在所有的非自定义拦截器之前,保证后面任何一个拦截器出现异常其都能捕获处理,CacheInterceptor在连接服务器之前,可以使其在连接网络之前就能读取缓存,最后是发送读取数据的CallServerInterceptor,做完所有的事情后它才来发送具体的请求。同时,又通过RealInterceptorChain类,去一次调用各个Interceptor。ConnectInterceptor和CallServerInterceptor,那我们再来看看这两个拦截器是怎么实现的。ConnectInterceptor:
1
2
3
4
5
6
7
8
9
10
11
12
@Override public Response intercept(Chain chain) throws IOException { RealInterceptorChain realChain = (RealInterceptorChain) chain; Request request = realChain.request(); StreamAllocation streamAllocation = realChain.streamAllocation(); // We need the network to satisfy this request. Possibly for validating a conditional GET. boolean doExtensiveHealthChecks = !request.method().equals("GET"); HttpCodec httpCodec = streamAllocation.newStream(client, doExtensiveHealthChecks); RealConnection connection = streamAllocation.connection(); return realChain.proceed(request, streamAllocation, httpCodec, connection); }
ConnectInterceptor主要是创建了一个HttpCodec对象,它有两个实现:Http1Codec 和 Http2Codec,它们分别对应HTTP/1.1和HTTP/2版本的实现。Http1Codec利用Okio对Socket的读写操作进行封装,Okio以后有机会再进行分析,现在让我们对它们保持一个简单地认识:它对java.io和java.nio进行了封装,让我们更便捷高效的进行IO操作。CallServerInterceptor:
1
2
3
4
5
6
7
8
9
10
11
12
13
14
15
16
17
18
19
20
21
22
23
24
25
26
27
28
29
30
31
32
33
34
35
36
37
38
39
40
41
42
43
44
45
46
47
48
49
50
51
52
53
54
55
56
57
58
59
60
61
62
63
64
@Override public Response intercept(Chain chain) throws IOException { RealInterceptorChain realChain = (RealInterceptorChain) chain; HttpCodec httpCodec = realChain.httpStream(); StreamAllocation streamAllocation = realChain.streamAllocation(); RealConnection connection = (RealConnection) realChain.connection(); Request request = realChain.request(); long sentRequestMillis = System.currentTimeMillis(); httpCodec.writeRequestHeaders(request); Response.Builder responseBuilder = null; if (HttpMethod.permitsRequestBody(request.method()) && request.body() != null) { if ("100-continue".equalsIgnoreCase(request.header("Expect"))) { httpCodec.flushRequest(); responseBuilder = httpCodec.readResponseHeaders(true); } if (responseBuilder == null) { Sink requestBodyOut = httpCodec.createRequestBody(request, request.body().contentLength()); BufferedSink bufferedRequestBody = Okio.buffer(requestBodyOut); request.body().writeTo(bufferedRequestBody); bufferedRequestBody.close(); } else if (!connection.isMultiplexed()) { streamAllocation.noNewStreams(); } } httpCodec.finishRequest(); if (responseBuilder == null) { responseBuilder = httpCodec.readResponseHeaders(false); } Response response = responseBuilder .request(request) .handshake(streamAllocation.connection().handshake()) .sentRequestAtMillis(sentRequestMillis) .receivedResponseAtMillis(System.currentTimeMillis()) .build(); int code = response.code(); if (forWebSocket && code == 101) { response = response.newBuilder() .body(Util.EMPTY_RESPONSE) .build(); } else { response = response.newBuilder() .body(httpCodec.openResponseBody(response)) .build(); } if ("close".equalsIgnoreCase(response.request().header("Connection")) || "close".equalsIgnoreCase(response.header("Connection"))) { streamAllocation.noNewStreams(); } if ((code == 204 || code == 205) && response.body().contentLength() > 0) { throw new ProtocolException( "HTTP " + code + " had non-zero Content-Length: " + response.body().contentLength()); } return response; }
这里有几个关键的地方:首先是httpCodec. writeRequestHeaders(request);,它是向服务器发送request header,然后是写入Request body:
1
2
3
4
5
6
7
// Write the request body if the "Expect: 100-continue" expectation was met. Sink requestBodyOut = httpCodec.createRequestBody(request, request.body().contentLength()); BufferedSink bufferedRequestBody = Okio.buffer(requestBodyOut); request.body().writeTo(bufferedRequestBody); bufferedRequestBody.close(); httpCodec.finishRequest();//发送请求
然后是读取response header,并且构造Response,并且添加Response body。最终返回我们需要的Response。HttpCodec完成的,而HttpCodec实际上利用的是Okio,而Okio实际上还是用的 Socket。
异步网络请求
先来看一下如何调用:
1
2
3
4
5
6
7
8
9
10
client.newCall(request).enqueue(new Callback() { @Override public void onFailure(Call call, IOException e) { } @Override public void onResponse(Call call, Response response) throws IOException { } });
这里主要是涉及到enqueue方法,那再来看一下enqueue方法的具体实现:
1
2
3
4
5
6
7
8
@Override public void enqueue(Callback responseCallback) { synchronized (this) { if (executed) throw new IllegalStateException("Already Executed"); executed = true; } captureCallStackTrace(); client.dispatcher().enqueue(new AsyncCall(responseCallback)); }
enqueue方法前面与execute方法一样,但是在后面,它将传入进来的Callback回调构建成AsyncCall对象后传入dispatcher的enqueue方法。上文说过dispatcher在同步请求中主要是标识请求状态,那么在异步请求中它又有什么作用。
1
2
3
4
5
6
7
8
synchronized void enqueue(AsyncCall call) { if (runningAsyncCalls.size() < maxRequests && runningCallsForHost(call) < maxRequestsPerHost) { runningAsyncCalls.add(call); executorService().execute(call); } else { readyAsyncCalls.add(call); } }
通过源码我们可以看到,在请求数量未满之前,传入的AsyncCall会被加到运行请求runningAsyncCalls队列中,并且添加到线程池运行,而超过数量之后则会添加到等待队列中,等到有请求完成从运行队列中删除后再添加到运行队列中。这里的请求在AsyncCall对象中发送,那AsyncCall又是怎样实现的呢?
1
2
3
4
5
6
7
8
9
10
11
12
13
14
15
16
17
18
19
20
21
22
23
24
25
26
27
28
29
30
31
32
33
34
35
36
37
38
39
40
41
42
43
final class AsyncCall extends NamedRunnable { private final Callback responseCallback; AsyncCall(Callback responseCallback) { super("OkHttp %s", redactedUrl()); this.responseCallback = responseCallback; } String host() { return originalRequest.url().host(); } Request request() { return originalRequest; } RealCall get() { return RealCall.this; } @Override protected void execute() { boolean signalledCallback = false; try { Response response = getResponseWithInterceptorChain(); if (retryAndFollowUpInterceptor.isCanceled()) { signalledCallback = true; responseCallback.onFailure(RealCall.this, new IOException("Canceled")); } else { signalledCallback = true; responseCallback.onResponse(RealCall.this, response); } } catch (IOException e) { if (signalledCallback) { // Do not signal the callback twice! Platform.get().log(INFO, "Callback failure for " + toLoggableString(), e); } else { responseCallback.onFailure(RealCall.this, e); } } finally { client.dispatcher().finished(this); } } }
通过源码我们可以看到,AsyncCall类是RealCall的内部类,同时,它还继承了NamedRunnable类,而NamedRunnable类则实现了Runnable接口,而 NamedRunnable的run方法主要就是运行execute方法。而AsyncCall的execute方法最重要的代码其实就一句:Response response = getResponseWithInterceptorChain();。接下来一切都与同步请求一样了,这里就不再复述了。
总结
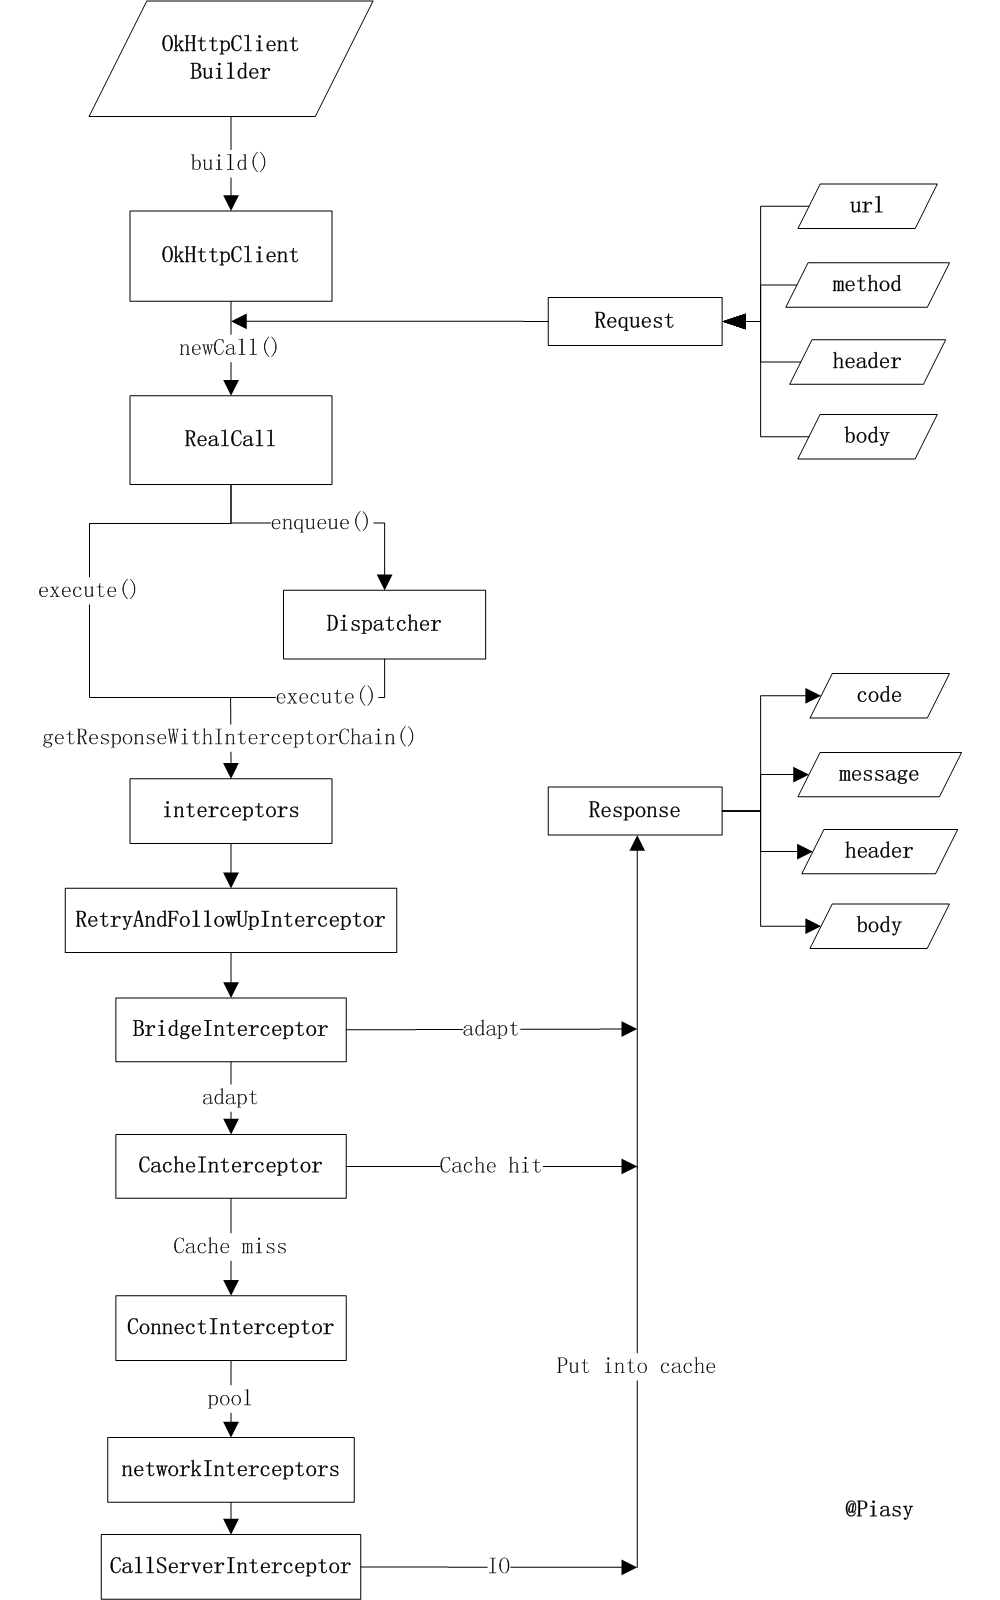
最后再来看一下整个流程图:(图片来源于拆轮子系列:拆 OkHttp )
参考资料:拆轮子系列:拆 OkHttp OKHttp源码解析